Two pantry staples and a handful of dried culinary lavender buds are all this floral syrup needs — stir it into lemonade, iced tea, coffee, or a cocktail. It only takes about ten minutes of active time, plus a short steep, and keeps in the …
Leftover bones — from a roasted chicken, or a bag of wings, backs, and necks from the butcher — turn into a rich, gelatinous broth in about two hours in the Instant Pot, instead of the better part of a day on the stove. Pressure …
No yeast, no proofing, no special equipment beyond a rolling pin — just a simple olive-oil dough rolled thin, cut into pieces, and baked until golden and crisp for these sesame crackers. They’re sturdy enough to hold a scoop of hummus or a slice of cheese without snapping, and they keep well for snacking straight from the jar.
1/4 cup (35g) sesame seeds, plus extra for topping
1/2 teaspoon salt
1/4 teaspoon baking powder
3 tablespoons olive oil
1/4 cup (60ml) water, plus more as needed
Flaky salt, for topping
Instructions
Whisk the flour, sesame seeds, salt, and baking powder together in a large bowl.
Add the olive oil and rub it into the dry ingredients with your fingers until the mixture looks sandy.
Add the water a little at a time, stirring, until a firm, smooth dough comes together. Knead briefly on a lightly floured surface, adding a touch more water if it feels dry.
Divide the dough in half. Roll each half out very thin, about 1/16 inch thick, between two sheets of parchment paper.
Cut into crackers with a knife or pizza cutter and prick each one a few times with a fork. Transfer to a parchment-lined baking sheet.
Brush lightly with water, then sprinkle with extra sesame seeds and flaky salt, pressing gently so they stick.
Bake at 375°F (190°C) for 12-15 minutes, rotating the pan halfway through, until golden and crisp.
Cool completely on the pan — the crackers crisp up further as they cool.
Nutrition Facts
Per cracker (estimated)
Calories:25
Total fat:1 g
Saturated fat:0 g
Cholesterol:0 mg
Sodium:30 mg
Carbohydrates:3 g
Fiber:0 g
Sugar:0 g
Protein:0 g
Estimated from USDA FoodData Central values for the ingredients and amounts listed above. Optional toppings, garnishes and ingredients added “to taste” are not included. Actual values vary with brands and portion size.
Why This Works
Rolling the dough thin is what separates a crisp cracker from a dense biscuit — at about 1/16 inch, there’s little enough dough that it dries out and shatters rather than staying chewy. Sesame seeds baked into the dough toast as the crackers bake, which is where a lot of the nutty flavor comes from.
Tips for the Best Sesame Crackers
Roll the dough between parchment rather than on a floured counter — it keeps the thickness even and makes transferring the rolled sheet to a baking sheet much easier. If the edges of your tray brown faster than the center, pull those crackers off a minute or two early rather than waiting for the whole batch to finish at once.
Variations
Swap black sesame seeds for some or all of the white for a striking two-tone look, or add a teaspoon of za’atar or everything-bagel seasoning to the dough for a different flavor. Grated Parmesan worked into the dough also makes a good savory variation, though it will brown a little faster in the oven. For a party spread, serve them alongside a classic shrimp cocktail.
Storage
Once fully cooled, store the sesame crackers in an airtight container at room temperature for up to 2 weeks. If they soften from humidity, a few minutes in a low oven will re-crisp them.
Common Mistakes to Avoid
Skipping the fork pricks is a common shortcut that backfires — without them, steam gets trapped under the dough and the crackers puff up unevenly instead of baking flat. Rolling the dough unevenly is another issue, since thinner spots will burn before thicker ones finish crisping; a rolling pin with removable thickness rings, or just rolling slowly and checking with your hand, helps keep it consistent. Pulling the crackers as soon as they look done is also worth resisting — they firm up significantly as they cool, so a batch that seems slightly underbaked in the oven is often perfect once cooled. Skip tasting the raw dough or batter, since the FDA notes that raw flour is not a ready-to-eat ingredient.
Frequently Asked Questions
Can I make the dough ahead of time? Yes. The dough can be wrapped tightly and refrigerated for up to 2 days before rolling; let it sit at room temperature for about 15 minutes first so it’s easier to roll out.
Why are my crackers chewy instead of crisp? For sesame crackers, this is almost always a thickness issue — dough rolled thicker than about 1/16 inch won’t dry out fully in the bake time given. Roll thinner and check for even thickness across the sheet.
Can I use a different oil instead of olive oil? Yes, a neutral oil like avocado or vegetable oil works fine and gives a milder flavor. Olive oil adds a slightly more savory, peppery note that pairs well with the sesame.
What can I serve these crackers with? They hold up well under hummus, whipped feta, or a soft cheese, and they’re sturdy enough to use for scooping dips without breaking. A cheese board is also a natural fit, since the sesame flavor doesn’t compete with most cheeses.
Written by
Junaid Khan
Runs RecipeFab, a site focused on straightforward, real-life recipes with clear instructions and honest ingredient lists.
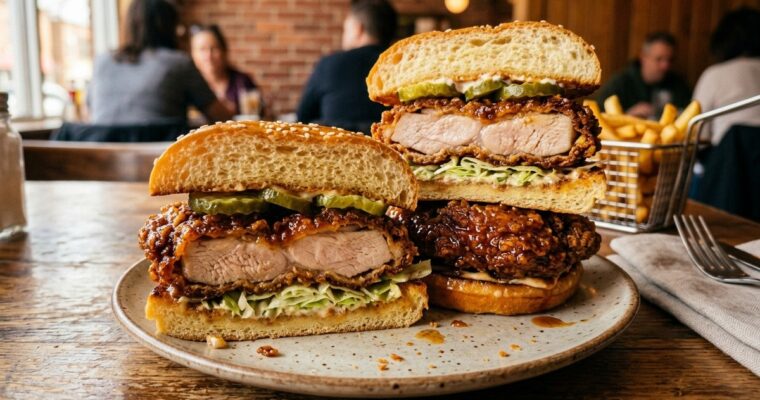
Boneless chicken thighs fry here until deeply crisp, then get coated in a spicy honey-cayenne glaze inspired by Nashville hot chicken. Piled onto a soft bun with pickles and a swipe of mayo, it balances real heat with enough sweetness to keep it from being …
Out of canned tomatoes but still have a can of tomato paste in the pantry? This sauce is the fix for that exact night. Simmering the paste with garlic, water, and seasonings builds it into a rich, well-rounded pasta sauce in about 20 minutes. It’s …
A short 20-minute rest stands in for the long rise most pizza dough needs here, so you can roll this thin crust base out paper-thin and bake it crisp the same night. It’s sturdy enough to hold a full layer of sauce, cheese, and toppings without going soggy in the middle. Two bases come out of one batch, ready for whatever toppings you have on hand.
Whisk together the flour, instant yeast, sugar, and salt in a large bowl.
Add the warm water and olive oil, and stir until a shaggy dough forms.
Turn the dough out onto a floured surface and knead for 5 to 6 minutes, until smooth and elastic.
Divide the dough into two equal pieces, cover with a towel, and let rest for 20 minutes at room temperature.
Preheat the oven to 475°F (245°C) with a baking sheet or pizza stone inside.
Roll each piece of dough out as thin as possible on a floured surface, aiming for an even thickness across the whole thin crust pizza base.
Carefully transfer the rolled dough onto the hot baking sheet, brush lightly with olive oil, and add your sauce and toppings.
Bake for 10 to 12 minutes, until the crust is golden brown and crisp at the edges.
Nutrition Facts
Per pizza base (without toppings) (estimated)
Calories:590
Total fat:15 g
Saturated fat:2 g
Cholesterol:0 mg
Sodium:880 mg
Carbohydrates:98 g
Fiber:4 g
Sugar:2 g
Protein:14 g
Estimated from USDA FoodData Central values for the ingredients and amounts listed above. Optional toppings, garnishes and ingredients added “to taste” are not included. Actual values vary with brands and portion size.
Why This Thin Crust Pizza Base Works
A short 20-minute rest is enough to relax the dough’s gluten so it rolls out thin without springing back, even though it’s far too brief to develop the flavor of a long-rise dough. Preheating the baking sheet or stone before the dough goes on means the bottom of this thin crust pizza base recipe starts crisping immediately instead of steaming in a cool pan, which is what keeps a thin crust from turning soggy under the toppings.
Tips for the Best Thin Crust Pizza Base
Roll the dough as thin and even as you can — any thick spots in a thin crust pizza base recipe will stay doughy while the thin areas crisp up and can even burn. Don’t overload the toppings; a heavy layer of sauce and cheese is more likely to make a thin crust soggy in the middle than it would a thicker one. Preheating the baking sheet or stone for the full oven preheat time makes a noticeable difference in how crisp the bottom turns out.
Common Mistakes to Avoid
Skipping the preheated baking surface is the most common mistake, since sliding raw dough onto a cold sheet gives the crust no head start on crisping before the toppings start steaming it. Overworking the dough with too much extra flour while rolling can make it tough instead of tender. Adding too much sauce is an easy way to end up with a soggy center, even on a well-baked crust. Skip tasting the raw dough or batter, since the FDA notes that raw flour is not a ready-to-eat ingredient.
What to Serve With Thin Crust Pizza
A simple green salad on the side balances a slice of pizza nicely. If you’re making your own sauce, a batch of tomato sauce from tomato paste comes together in the same amount of time as the dough rests.
Storage
Store unbaked thin crust pizza base dough balls wrapped tightly in the refrigerator for up to 2 days, or freeze for up to 3 months and thaw in the fridge overnight before rolling. Leftover baked pizza keeps in the refrigerator for up to 3 days — reheat in a hot oven or skillet rather than the microwave to keep the crust crisp.
Frequently Asked Questions
Can I make this thin crust pizza base recipe ahead of time? Yes — the dough balls can be refrigerated for up to 2 days after the initial rest; let them sit at room temperature for 15 minutes before rolling out.
Why is my thin crust pizza soggy in the middle? A soggy center usually means too much sauce or too many wet toppings, or that the baking surface wasn’t fully preheated before the dough went on.
Can I use whole wheat flour for this thin crust pizza base recipe? Yes — substituting up to half the flour with whole wheat works, though the dough will be slightly less stretchy and a bit denser once baked.
Do I need a pizza stone to make this recipe? No — a regular baking sheet preheated in the oven works well; a pizza stone or steel just gives slightly better browning on the bottom.
Written by
Junaid Khan
Runs RecipeFab, a site focused on straightforward, real-life recipes with clear instructions and honest ingredient lists.
Crunchy pistachio–kunafa filling, the kind that made the viral Dubai chocolate bar famous, meets a classic baked New York-style cheesecake in this recipe. Toasted shredded phyllo mixed with pistachio cream sits in a layer through the center, adding a genuine crunch against the smooth cheesecake. …
A 1:1 gluten-free flour blend is what keeps this pumpkin loaf moist and tender, without the dense, gummy texture that gluten-free quick breads sometimes have. Real pumpkin puree and a mix of warm spices keep it tasting like a classic pumpkin loaf, not a gluten-free …
Real pumpkin puree and warm pumpkin spice go into a batter that bakes in a donut pan instead of frying, so there’s no hot oil to manage. A quick roll in melted butter and cinnamon sugar right after baking gives them that classic just-fried texture and flavor. They come together fast enough for a weekday fall breakfast.
1/2 cup granulated sugar mixed with 1 tsp cinnamon, for coating
Instructions
Preheat the oven to 375°F (190°C) and grease a donut pan.
Whisk together the flour, baking powder, baking soda, cinnamon, nutmeg, cloves, and salt in a bowl.
In a separate bowl, whisk the pumpkin puree, brown sugar, granulated sugar, milk, melted butter, egg, and vanilla extract until smooth.
Pour the wet ingredients into the dry ingredients and stir just until combined — a few small lumps are fine.
Spoon or pipe the batter into the donut pan cavities, filling each about three-quarters full.
Bake for 10 to 12 minutes, until the tops spring back when lightly pressed. Let cool in the pan for 5 minutes.
While still warm, brush each baked pumpkin donut with melted butter, then roll it in the cinnamon sugar mixture until fully coated.
Serve warm or let cool completely before storing.
Nutrition Facts
Per donut (estimated)
Calories:190
Total fat:5 g
Saturated fat:3 g
Cholesterol:25 mg
Sodium:200 mg
Carbohydrates:35 g
Fiber:1 g
Sugar:22 g
Protein:3 g
Estimated from USDA FoodData Central values for the ingredients and amounts listed above. Optional toppings, garnishes and ingredients added “to taste” are not included. Actual values vary with brands and portion size.
Why This Baked Pumpkin Donut Works
Baking this baked pumpkin donut recipe instead of frying means the batter can include a higher ratio of pumpkin puree without turning greasy, since there’s no oil to soak into the crumb. Coating the donuts in butter and cinnamon sugar while they’re still warm is what gives them that just-fried texture and flavor, since the warm surface lets the sugar coating stick evenly instead of falling off.
Tips for the Best Baked Pumpkin Donuts
Use plain pumpkin puree, not pumpkin pie filling, which already contains added sugar and spices that will throw off the recipe. Don’t overfill the donut pan cavities — three-quarters full leaves room for the batter to rise without losing the donut shape. Coat the donuts in cinnamon sugar as soon as they’re cool enough to handle; this baked pumpkin donut recipe doesn’t work as well once they’ve cooled all the way, since the sugar won’t stick.
Common Mistakes to Avoid
Overmixing the batter is a common mistake that leads to dense, tough donuts instead of a tender crumb — stir only until the flour disappears. Skipping the butter brush before rolling in cinnamon sugar leaves a patchy, uneven coating. Letting the donuts cool completely before coating means the sugar mixture won’t adhere well, since it needs a slightly warm, buttery surface to stick to. Skip tasting the raw dough or batter, since the FDA notes that raw flour is not a ready-to-eat ingredient.
Store this baked pumpkin donut recipe in an airtight container at room temperature for up to 2 days, or refrigerate for up to 5 days. The cinnamon sugar coating softens over time, so for the best texture, freeze uncoated donuts for up to 2 months and coat them fresh in butter and cinnamon sugar after reheating.
Frequently Asked Questions
Can I make this baked pumpkin donut recipe without a donut pan? Yes — bake the batter as muffins in a lined muffin tin instead, adding a couple of extra minutes to the bake time.
Can I use canned pumpkin pie filling instead of puree? It’s not recommended, since pie filling already contains added sugar and spices that will make the donuts overly sweet and change the intended flavor balance.
Why did my baked pumpkin donuts turn out dense? Dense donuts usually mean the batter was overmixed — stir just until the dry ingredients are moistened, with a few small lumps left.
Can I freeze these donuts? Yes — freeze them uncoated for up to 2 months, then thaw, warm briefly, and roll in fresh butter and cinnamon sugar before serving.
Written by
Junaid Khan
Runs RecipeFab, a site focused on straightforward, real-life recipes with clear instructions and honest ingredient lists.
Cocoa powder, a touch of milk chocolate, and mini marshmallows — the flavor of a cup of hot chocolate — turn into a warm, fluffy microwave cake in one mug here. It bakes up soft rather than dense, closer to a cake than a brownie, …