Skip the hot pan and fast whisk most people default to — low heat and a lot of patience are what actually get you genuinely creamy scrambled eggs. It takes barely five minutes from bowl to plate, and the same basic method scales from a …
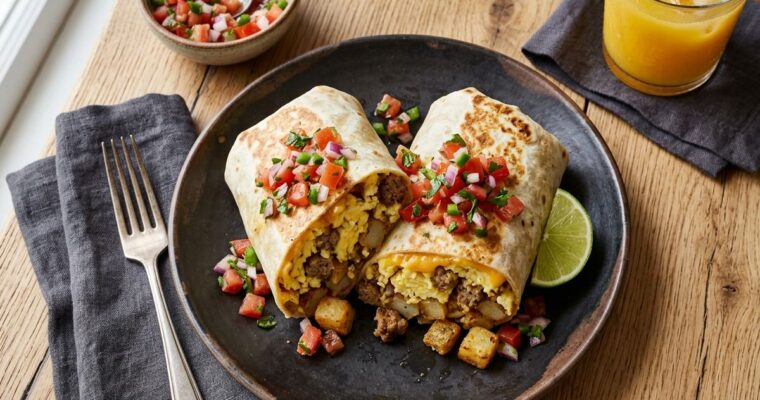
Scrambled eggs, crispy potatoes, sausage, and melted cheese all wrap into one warm flour tortilla here, for a breakfast that’s filling and portable. It also freezes well, so you can make a batch on the weekend and have breakfast ready all week. Why This Easy …
Three eggs, five minutes, no flipping required — that’s all this omelette recipe takes to turn out a soft, restaurant-style fold. The real trick is walking away from high heat — a gentle, patient cook is what keeps the eggs tender instead of rubbery. This version keeps the ingredient list minimal so the technique, not a long shopping list, is what makes it good.
1 tbsp water or milk (optional, for a softer texture)
1 tbsp unsalted butter
1 pinch salt
1 pinch black pepper
¼ cup shredded cheese (optional)
Instructions
Crack the eggs into a bowl, add the water or milk if using, and season with salt and pepper. Whisk until no streaks of white remain.
Heat the butter in a nonstick skillet over medium-low heat until it foams and the foam starts to subside.
Pour in the eggs. Let them sit undisturbed for a few seconds, then gently push the cooked edges toward the center, tilting the pan so the uncooked egg flows to the edges.
When the top is just barely set but still slightly wet, sprinkle on the cheese or any other fillings.
Fold the omelette in half, slide it onto a plate, and serve immediately.
Nutrition Facts
Per serving (estimated)
Calories:320
Total fat:26 g
Saturated fat:12 g
Cholesterol:590 mg
Sodium:350 mg
Carbohydrates:1 g
Fiber:0 g
Sugar:1 g
Protein:19 g
Estimated from USDA FoodData Central values for the ingredients and amounts listed above. Optional toppings, garnishes and ingredients added “to taste” are not included. Actual values vary with brands and portion size.
Filling Ideas
Shredded cheddar, mozzarella, or feta all melt well inside a folded omelette. Sautéed mushrooms, spinach, diced ham, or fresh herbs like chives and parsley are all easy additions — just keep the total amount of filling small enough that the omelette still folds closed without spilling.
Tips for This Egg Omelette Recipe
Keep the heat at medium-low for the entire cook. High heat is the most common reason homemade omelettes turn tough, dry, and browned instead of pale and tender — eggs finish cooking fast and don’t need aggressive heat to set properly. Cook the eggs until the whites are fully set, and bring baked egg dishes such as casseroles to 160°F, per the USDA safe temperature chart.
Add fillings sparingly, and pre-cook anything watery before it goes in. Raw vegetables or cold cheese straight from the fridge can cool the eggs down fast and leave the center undercooked, so warm or pre-cook watery vegetables like mushrooms, spinach, or tomatoes first.
A well-seasoned or good nonstick skillet makes folding effortless. If the eggs stick even slightly, the omelette will tear instead of folding cleanly, so don’t skip this step even if it means fewer fillings.
Don’t walk away completely — this egg omelette recipe cooks in under two minutes once the pan is hot, so stay close and keep pushing the eggs from the edges toward the center the whole time.
Storage and Reheating
Omelettes are best eaten right away since the texture changes quickly once they cool, but leftovers will keep in an airtight container in the refrigerator for up to 2 days.
Reheat gently in a covered nonstick pan over low heat, or in the microwave in short 15-second bursts, just until warmed through. High heat during reheating is what makes eggs turn rubbery the second time around.
What to Serve With It
A simple omelette pairs well with buttered toast, fresh fruit, or a light side salad for a heartier breakfast or lunch. It also works well as a quick, low-effort dinner alongside roasted vegetables or a bowl of soup. Weekend brunch spreads are another natural fit, especially alongside pancakes or fresh-cut fruit. If you like this egg omelette recipe, also try the Easy Shakshuka Recipe for another simple egg dish. For a heartier one-pan breakfast, try a breakfast skillet.
Why does my omelette turn out rubbery? This almost always comes down to cooking over heat that’s too high, or leaving the eggs in the pan too long after they’re already done. Lowering the heat and pulling the pan off just before the center looks fully set solves it every time.
Do I need milk or water in the eggs? Not necessarily — plain eggs make a perfectly good omelette on their own. A small splash of water can make the texture slightly lighter and softer, but it’s optional rather than required.
Can I make a bigger omelette with more eggs? You can, but it’s best to stick to 3 to 4 eggs per omelette in a standard skillet. Any more than that makes the omelette too thick to cook evenly and fold well, so it’s better to make a second one instead.
What’s the difference between an omelette and scrambled eggs? An omelette is cooked mostly undisturbed and folded into a single shape, while scrambled eggs are continuously stirred into soft curds. They use the same basic ingredients but end up with completely different textures.
A long ingredient list isn’t what makes good French toast — this simple recipe proves it. Four eggs, a splash of milk, and bread that’s a day or two old cover most of what makes a good batch, and the custard soaks in fast enough …
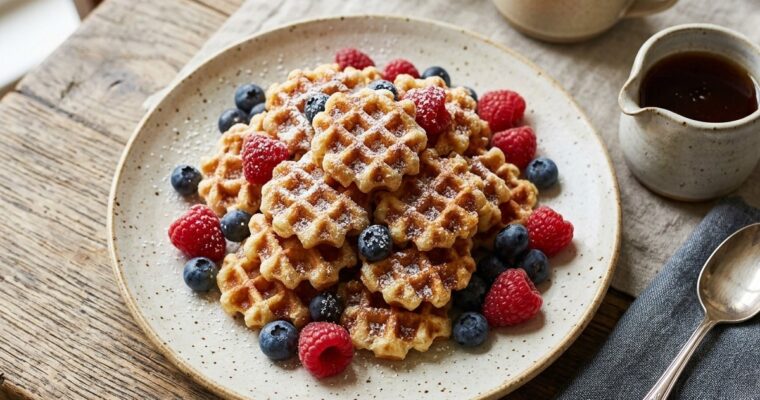
Portioning breakfast gets almost too easy with this mini waffle recipe, which cooks faster than a full-size batch. This version leans on whipped egg whites for a lighter crumb and a genuinely crisp shell, which is where most flat, chewy waffle recipes go wrong. Crispy …
Craving something crunchy without reaching for a bag of chips? These crispy baked Parmesan zucchini bites are the answer. A panko-Parmesan crust bakes up golden in the oven, no deep frying required, and a bowl of warm marinara on the side makes them disappear fast.
Preheat oven to 425°F and line a baking sheet with parchment paper.
In one bowl, whisk the eggs. In a second bowl, stir together the panko, Parmesan, garlic powder, oregano, paprika, salt, and pepper.
Pat the zucchini rounds dry, dust lightly with flour, dip in the egg, then press into the panko mixture to coat both sides.
Arrange the coated zucchini in a single layer on the prepared sheet and mist lightly with olive oil spray.
Bake for 18–20 minutes, flipping halfway through, until golden and crisp.
Serve hot with warm marinara sauce for dipping.
Nutrition Facts
Per serving (1 of 4) (estimated)
Calories:240
Total fat:8 g
Saturated fat:3 g
Cholesterol:105 mg
Sodium:710 mg
Carbohydrates:28 g
Fiber:3 g
Sugar:7 g
Protein:12 g
Estimated from USDA FoodData Central values for the ingredients and amounts listed above. Optional toppings, garnishes and ingredients added “to taste” are not included. Actual values vary with brands and portion size.
Tips for the Crispy Baked Parmesan Zucchini Bites
Salt the zucchini rounds and let them sit on a paper towel for 10 minutes before breading; this pulls out extra moisture so the panko coating stays crisp instead of turning soggy in the oven. A wire rack set over the baking sheet also helps air circulate underneath for extra crunch.
These crispy baked Parmesan zucchini bites are best eaten fresh from the oven while the coating is still crackly. If you want to reheat leftovers, use the oven or an air fryer rather than the microwave, which will soften the crust.
What to Serve With It
Warm marinara is the classic dip here, but a garlicky yogurt-based ranch or a squeeze of lemon works well too. These zucchini bites also make a great party appetizer alongside other quick snacks, or a light side to a bigger dinner like pasta or grilled chicken. For a party appetizer table, set them out next to a chilled shrimp cocktail, and if you are weighing snack options, our chips and queso calories breakdown compares common chip-and-dip choices.
Why These Zucchini Bites Work
The double-coating step is what keeps these crisp instead of soggy: a light dust of flour first gives the egg wash something to grip, and pressing (rather than just dipping) the rounds into the panko-Parmesan mixture packs the crumbs on thick enough to survive baking without falling off. The Parmesan in the coating itself browns and crisps in the oven’s dry heat, doing some of the work a deep fryer would normally handle, without the added oil. For ingredient-level nutrition data, USDA FoodData Central is the most reliable free reference.
Common Mistakes to Avoid
Skipping the salt-and-pat-dry step is the most common reason these turn out soft instead of crunchy — zucchini holds a lot of water, and it will steam the coating from the inside if it goes into the oven wet. Overcrowding the baking sheet is the second common issue: rounds that touch steam each other instead of crisping, so give them room and use two trays rather than one packed one. Skipping the flip halfway through bake time also leaves one side pale and slightly soft instead of golden on both sides.
Storage
Leftover zucchini bites keep in an airtight container in the refrigerator for up to 2 days, though the coating softens as they sit. Reheat in a 400°F oven or air fryer for 4-5 minutes to bring back the crunch — the microwave will leave them limp. These don’t freeze well either raw or cooked, since zucchini’s high water content turns mushy once thawed. Refrigerate leftovers within 2 hours of cooking, as the USDA leftovers guidance recommends.
Frequently Asked Questions
Can I air-fry these instead of baking? Yes. Arrange the coated zucchini in a single layer in the air fryer basket and cook at 400°F for about 10-12 minutes, flipping halfway, until golden and crisp.
Why are my zucchini bites soggy instead of crispy? This is usually excess moisture. Salt the zucchini rounds and pat them dry before breading, and make sure they are spread in a single layer with space between each piece so steam can escape.
Can I make these ahead of time? They are best fresh, but you can bread the zucchini rounds up to a few hours ahead and refrigerate them on the tray, then bake right before serving.
Written by
Junaid Khan
Runs RecipeFab, a site focused on straightforward, real-life recipes with clear instructions and honest ingredient lists.
Maximum crunch and color are the goal here — a mix of crisp vegetables tossed in a bright lemon vinaigrette that ties this rainbow harvest salad together. It’s hearty enough to be a meal on its own, or a stellar side for anything off the grill.
In a large bowl, combine the mixed greens, cabbage, tomatoes, and carrot ribbons.
In a small jar, shake together the olive oil, lemon juice, honey, salt, and pepper until emulsified.
Drizzle the vinaigrette over the salad and toss well to coat.
Top with crumbled feta and toasted nuts or seeds just before serving.
Nutrition Facts
Per serving (1 of 4) (estimated)
Calories:240
Total fat:21 g
Saturated fat:5 g
Cholesterol:15 mg
Sodium:240 mg
Carbohydrates:10 g
Fiber:2 g
Sugar:5 g
Protein:5 g
Estimated from USDA FoodData Central values for the ingredients and amounts listed above. Optional toppings, garnishes and ingredients added “to taste” are not included. Actual values vary with brands and portion size.
Tips for the Best Harvest Salad
Shave the carrot into thin ribbons with a vegetable peeler rather than grating it — the wider ribbons hold up better against the dressing and add more visual contrast against the purple cabbage. Toast the nuts or seeds in a dry skillet over medium heat for 2-3 minutes, stirring often, since raw nuts taste flat next to the bright vinaigrette. Salt the cabbage lightly and let it sit for five minutes before mixing everything together; this softens the sharp edges without turning the salad soggy. For ingredient-level nutrition data, USDA FoodData Central is the most reliable free reference.
Storage and Make-Ahead Tips
This rainbow harvest salad keeps best when the vinaigrette is stored separately from the vegetables; toss them together only when you are ready to eat. Chopped vegetables stay crisp in an airtight container in the fridge for up to 3 days, while the dressing keeps for about a week in a sealed jar. Hold off on adding the feta and toasted nuts until serving, since both lose their texture if they sit in the dressing too long. Leftover harvest salad is best eaten within a day if it is already dressed, since the greens will wilt, but undressed components hold up well for meal prep throughout the week. Refrigerate leftovers within 2 hours of cooking, as the USDA leftovers guidance recommends.
What to Serve With It
This harvest salad pairs well with roasted chicken, grilled salmon, or a warm bowl of soup on a cooler day. For a vegetarian spread, serve it alongside crusty bread and a wedge of hard cheese. It also travels well to potlucks, since the sturdy greens and vegetables hold up better than delicate lettuce if you need to pack it ahead of time. For another hearty grain-based salad, try our elote quinoa salad.
Frequently Asked Questions
Can I use a different vinegar instead of lemon juice? Yes, apple cider vinegar or a mild white wine vinegar both work well in place of lemon juice, though you will want to start with a bit less since vinegar tends to taste sharper than citrus.
What other vegetables work in this harvest salad? Shredded Brussels sprouts, thinly sliced fennel, or roasted butternut squash are all good additions if you want to lean further into the fall harvest theme. Any of these swaps keep the salad firmly in harvest salad territory while letting you use whatever produce looks best that week.
Can I make this salad vegan? Swap the honey for maple syrup and the feta for a plant-based cheese or extra toasted nuts, and the rest of the recipe stays exactly the same.
Written by
Junaid Khan
Runs RecipeFab, a site focused on straightforward, real-life recipes with clear instructions and honest ingredient lists.